Thursday, February 24, 2011

staycation: go!

Well it's upon us: our lovely "staycation" with lots and lots of house projects!

I'm going to take the week off from blogging to get the most amount done around here, so check back in a week from Monday for lots of fun before & afters! 

Here's some of the projects we're planning to do in case you're interested! 

Have a great week!


**Don't forget Silhouettes are 50% off until the end of Feb!**
{Send me an email before Mar 1st and I'll give you the rate... even though I may not get back to you right away!}

Wednesday, February 23, 2011

my favorite sewing tips & tricks


 No. 1: Tearing fabric 

I learned this trick from the wonderful Urban Arts & Crafts {Kansas City}. Cotton fabric will tear perfectly!! It saves so much time {and frustration} cutting! It tears perfect every time! 


No. 2: Strong needles

I used to sew some heavy duty projects on a regular basis and was breaking needles left and right. I finally decided just to go for the strongest needles and never changed back. I still break needles but not nearly as much, and hardly ever on the lighter projects.


No. 3: {Little} Thread on hand

Before I had a sewing machine I had little sewing kits that came with all the lovely different color samples of thread. I never got rid of them and actually have found them super useful when sewing a project and then realizing I don't have coordinating thread. No kidding, 100% of the time I have found thread in my pile of samples that has worked! It's not ideal of course, and there's not much there, but it's so nice to have on hand!


No. 4: Fabric on Hand

I never regret having loads of fabric- it creates inspiration! I hardly ever buy my fabric at full price. If I make a lot of something I like to go to Joannes and use their 40% off "one cut" of fabric and stock up! It's harder to find designer fabric on sale- for that I usually have to just pay full price, but when I can find it- I stock up! 


No. 5: Coordinating fabric

For a short time I sewed some baby bedding {it was a lot of work which is why I stopped}, but in my 'research' of the baby bedding industry I noticed something- almost every bed had the following:

1. A patterned fabric {sometimes a big and little together}
2. A solid fabric 
3. A striped or a poka-dot fabric


from Pottery Barn Kids

This has been so helpful in not only sewing projects, but also designing my home spaces {and even outfits at times!} It always works to balance everything and make a nice look.

Tuesday, February 22, 2011

preparation : staycation

I am so excited for our "staycation" next week! Ben has the week off and the girls are going to a friends- we will just be here doing lots and lots of projects! Can't wait! 

I picked out some paint colors today... {Thanks to my lovely friend who watched the girlies so I could go and spend a few precious hours by myself... don't you just love those times?}


{Pale Cowslip 1}         {Spruce Frost}          {Gray Morning}

As of now- we'll see how they look on the walls! {And could I say I much prefer the last two color names to the first?}

On the week's agenda...

Re-painting the living room, hallway, dining room, and kitchen
Putting up paneling in our dining room 
Installing new light fixtures
Building a wall for a second bedroom/office

And if we have time...

Stenciling our kitchen floor {possibly not too far from this}

{DIY project from Under the Sycamore: Ashley Ann Photography}

And building a fabulous crafting desk for yours truly! {Quite like this}

{Pottery Barn} 

Oh PS I love that color on the walls and that's pretty much what I'm going for in the Living Room!


Sunday, February 20, 2011

lighting inspiration

In preparation for our "stay-cation remodeling-week" {quickly approaching} I'm looking for some inspiration for a new dining room light fixture. I'm in between re-vamping the one I have now, or just buying a new one... or making one {always an option of course}.

Here are some beautiful fixtures I just couldn't resist sharing... {in reality I just really need your opinion}

These are all sort of concepts that I love. I most likely won't be able to get the exact of any of them, but I would like to try and recreate if it's at all possible.

...

I think this one is just fun... or is it too different?

from Pottery Barn

I love the idea of branches... I don't know how I'd pull it off, what do you think?

from Pottery Barn

from David Westman

And there's just something about this one...

unknown source

And then there are drum shades... 

unknown source

DIY project from Cre8tivedesignsinc.com

from Lumens.com

And on to crystal... just one of these will do, although I have to say I love the look of many!

unknown source

from Decorpad.com

So I need your input... favorites? 

Friday, February 18, 2011

a simple pattern {tutorial}

I needed a new kitchen towel- thought I'd make one.


If you're looking for a beginning sewing project, this is a great one to start with.

The following tutorial can be used for baby blankets and pillows as well! {Specific instructions for these are at the bottom of the post}


I started with about a half yard piece of upholstery fabric from Joanne's and some towel like material I had {I couldn't tell you what it's called but I know Joanne's carries it}


Cut the two pieces to your desired length and width {I just used an old kitchen towel to measure from}

Place the two pieces together- wrong sides out and pretty sides facing.


Pin them together.


Begin to sew {A quilting foot works wonders if you're having problems with the material pulling}


Make sure to back stitch whenever you start and end- to ensure your stitch won't unravel.


Here's how I do corners... I get to the edge then manually put the needle down, put the sewing foot up, and twist the fabric. It's much easier than starting and stopping, and you don't have to backstitch.


Sew until about the middle of your last side and backstitch so the seam won't unravel.


You should have a pocket like this {I like the pocket to be located in the middle of one of my sides rather than at the edge}

Make sure to cut the extra fabric at the corners and sides before flipping- the corners will lay much nicer this way.


Flip it inside out.


Sew the pocket closed {make sure you have coordinating thread}. I like to sew all the way around to hide my pocket seam- I definitely do this when sewing a baby blanket.


And there you have it. A very simple kitchen towel!

For a pillow: change up the fabric and when you are at the spot where you have your pocket, just stuff it then sew closed!

For a baby blanket: Change the fabric and make sure to sew around the edge or add a binding!


Check here for more sewing tutorials!


Wednesday, February 16, 2011

fresh flowers

We are having a few very warm days for February, and it's gotten me thinking about Spring!

{I'm aware we will most likely have a few more cold snaps before real Spring comes but it's so nice to have a break from the cold.}

So here's what I'm excited about coming this spring...

Fresh cut garden flowers! 
{Notably Hydranges & Wild flowers that I will be having in my garden}


I think it's so fun to have fresh flowers in my house during the Spring and Summer... any other suggestions for good {cutting} flowers to plant this Spring?


Tuesday, February 15, 2011

learn to sew {tutorial series}: No.1


And on to the first installment of my tutorial series: Learn to Sew! The following tutorial isn't necessary for everyone- {if you already know how to work your machine}- but for those who maybe have a machine and have never used it, or who are thinking of getting one, I'm hoping this could be a useful resource for them.

When I first got my machine I had to figure out how to use it on my own... and got quite frustrated trying to read the manual. So here's a {hopefully helpful} guide on your machine and how to thread it and the bobbin.

PS... My machine is a very basic model

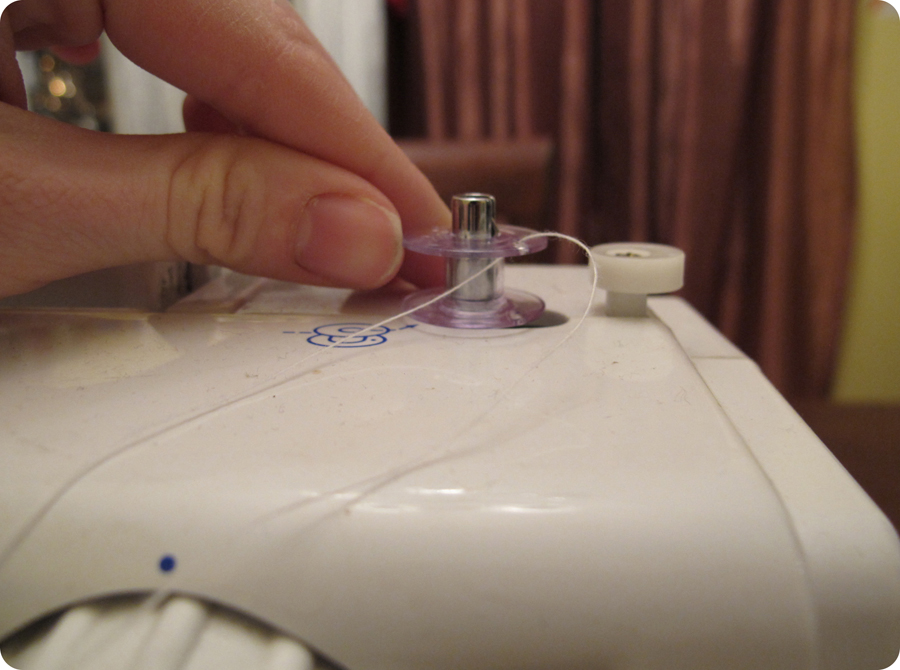
Step 1: Threading the Bobbin


Put your desired color of thread on the machine.


Follow the instructions on your machine- mine has the dotted line to tell me how to thread my bobbin.


I loop it around that little screw just like the picture. 


Thread the bobbin {Make sure to get the correct bobbins for your machine- I've had lots of headache using the wrong bobbins on accident.}


For my machine, in order to wind the bobbin I need to push it over to disengage the needle from going up and down when I step on the foot pedal. {When you're done winding, make sure to push back}.


Wind the bobbin to desired amount by stepping on the foot pedal.


Bobbin wound! {I didn't wind it all the way because I was short on thread...}


Place bobbin into bobbin case and pull the string to ensure the bobbin rotates clockwise.


Place bobbin case in machine after it's threaded.


Bobbin threaded! Now thread the top of the machine in order to pull the thread through...

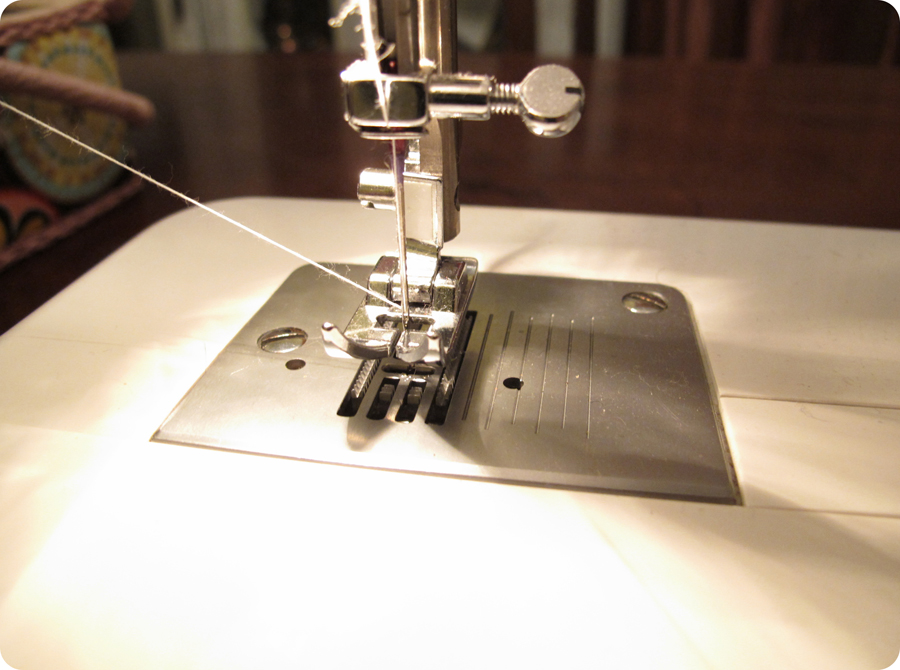
Step 2: Threading the Machine

{Before threading make sure the sewing foot is UP}


I find cutting the end of the thread is the best way to thread the needle {keep in mind I don't have an automatic threader on my machine}


Now to pull the bottom thread through...


Manually wind the needle down using the side of the machine


And back up while gently pulling on the top thread.


A loop should come up with the thread- pull one side of the loop to find the end of the thread.


Place both threads under the sewing foot.


A fully threaded machine! {Make sure the thread length is sufficient enough that the machine won't unthread while sewing- I usually have it extend a few inches past my machine.}

If the machine is threaded correctly the top thread should pull easily.


A good rule is to keep this dial right at around 4 for most sewing jobs


This dial will tell you the distance between your stitching {1 and 0 being a very tight stitch and 4 being widest}


Choose a stitching type and you are ready to go!


I hope this was helpful to you! If you are having troubles with your bottom thread getting messed up when you sew try threading the top of the machine again and checking that your bobbin is threaded correctly.

LinkWithin

Related Posts Plugin for WordPress, Blogger...