Tuesday, January 11, 2011

a little chair

Zuriah got a very special rocking chair for Christmas last year. 

Anah loves it- but so does Zuriah.

This year Grandpa came to the rescue by getting Anah her very own special rocking chair {but it was just begging for a little decoupage}


Doesn't it look like something should go on the circle? I thought adding her name would be best {that way we won't have arguments over whose chair is whose...}


I got this little calligraphy pen and ink at Hobby Lobby- about $12 for the pen, tips, and ink- I've used it again and again, I love having it!


I don't have a protractor... this works.


I first added a little layer of Mod Podge on the wood circle then layed the cut paper over it and added another 4 layers of Mod Podge on top {drying in between each layer}

The bubbles went away after it was completely dry.


All done and all cute! 

It's even stood the peeling challenge from Anah- it's not coming off- perfect for a baby chair.

Monday, January 10, 2011

{love notes}

I have something to admit: I'm not a big fan of Valentines Day. I couldn't really tell you why, maybe it's that I don't like red... but I am a big fan of letting people know you love them! 

So I compiled some little cards for you to print.


Not in red.

For fun.

For people you love.


{& for use at anytime, not just Valentines Day}

Simply print on white cardstock {color download recommended} or pretty paper {black and white download recommended} 8.5"x11"

And cut along {or inside or outside} the dots


Friends 

{8 card color document}


{8 card black and white document}


Husband 

{I thought it would be a cute idea to use them all and put them in various places throughout the day}

{4 card color document}


{4 card black and white document}


**A note: for some reason when the document pops up there is a white spot on the big hearts- after download it's not there, so I would suggest to download then print just to be safe {as opposed to printing directly from the website} sorry for the trouble**

Friday, January 7, 2011

things we build

I've been married to Ben for 5 years. In 5 years of marriage we have never had a headboard for our bed- until just a few months ago when I decided to go to Lowes and buy lumber to build one myself. It worked out perfectly because as I walked through our door my non-carpenter husband said, "you're not building it, I am." {Of course I'm much more of a non-carpenter than he is}.

We've only ever helped our parents build things for us {like our downstairs bathroom and back deck, but never furniture, and never by ourselves}.

So this was an adventure. Let me start out by saying I've never known someone to be more of a perfectionist than Ben. Which is why the headboard is perfect, but I'm fully confident you can do this project, it took him {remember a non-carpenter- who as a perfectionist works slower than most} about an hour to build!


I got this plan off Ana-White.com {one of my favorite blogs}. It's the same as this $800 Pottery Barn headboard. We modified the plans a little bit {instead of adding in 1x6 boards we stuck with the 1x4's the whole way for price sake- adding them in would have been about an extra $20}


This cost us around $70 to build.


At first I wanted to just paint it, but Ben liked the grain of the wood too much, and I had to agree with him. So for the finish I liked the idea of a weathered look, so I first stained it white {I believe the guy at Lowes called it "pickling"}

Next I painted a dark gray paint over it {only a little at a time} then wiped it off with a rag. {If you're going to do this technique remember to stay with the grain}.


It only took me about an hour to stain and do the weathered finish.

We waited a night to bring it upstairs so it would have ample time to dry.


And there you go- for $70 and two hours, a handmade solid {$800 look} headboard!


Thursday, January 6, 2011

exodus {for a three year old}

For Christmas I bought the girls a dvd of Moses- actually "The Ten Commandments" kids version {I love "Prince of Egypt" but I wish it finished the story} this one wasn't as great quality wise, but it had the whole story, which is GREAT.

So when the movie was finished I decided to start a Bible study with Zuriah. We are reading through Exodus! Of course I'm reading a little bit ahead and putting it into the best language that she can understand. I'm not a huge fan of Bible "stories" for children {with the exception of the Jesus Storybook Bible which is incredible} but when I can read the Bible and summarize it for her myself I think it's much better {and offers a better application for her life} AND I get the Word too!


:::


So here's how I'm doing it:

Every day {or every other day} I read 1-2 chapters then summarize it for her in her language 
for example: "the Pharaoh wanted to hurt all the babies, so Moses' mommy put Moses in a basket so he would be safe"

I talk to her about what we read and see what she can recall

I add a practical application, for example: "if someone wants to hurt someone you love do you protect them? Does God protect you? Does mommy and daddy protect you? God is our banner- He protects us, it's one of His names."

I make up a craft for her to make to go along with the passages we read

I talk to her about the craft and again see what she can recall


::: 


For our first craft we made a basket for baby Moses out of popsicle sticks and made a baby out of pipe cleaner with a puff ball for his head. {Baby boy Moses is completely pink in case you wanted to know}

I hope I can encourage you to do a Bible study with your kiddos too- {of course it doesn't have to be Exodus} even Anah at 18 months loves to sit while I read. No matter the age it's great family time and so good for them to learn what God's Word says.

Wednesday, January 5, 2011

{re}design time!

It's the new year and with it comes new projects! Ben promised me about a month ago when I was putting up our Christmas decor {and saying how I'd love to re-do all our main floor rooms} that I could "next year". Which I'm 90% sure means now. 


In our living room we have two floor to ceiling windows {which I LOVE} but they are a little deceiving. When we moved in I thought our living room would always have tons of light. Sadly I was wrong. And sadly I painted the walls brown which now sort of depress me during the days. 

On the other hand my dining room is full of light and the walls are yellow... just a little too yellow. I have never loved the color {I meant it to be a bit lighter} but it is cheery.

And my kitchen... well it's a burnt red right now and with all the white cabinets it's decent on cheer. I'm in between on re-doing that room.

So it could be that it's January, but I need some change and I need some brighter rooms.

So here goes my color choices...


I LOVE this color for my living room walls. {unknown photo source}


but I also love the touch of green. {photo from Apartment Therapy}


currently we have a patch of drywall above our sliding glass door that I really like the color of actually. I love the light gray and white. Clean and simple. {photo from Apartment Therapy}


Also I'm in love with this color right now- I call it "artist's clay". I might try it for the dining room but I don't want to make the mistake of going too dark again. {photo from classic-interior-design.blogspot.com}


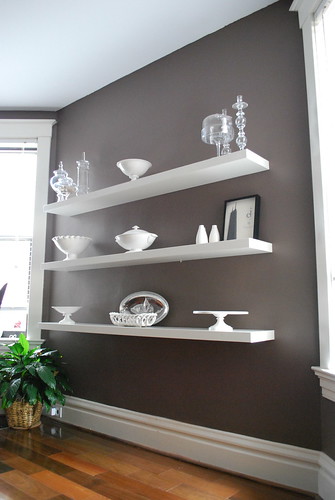
Also did you notice that giant hutch in our dining room? It's definitely too big for the room {it used to be where our sliding door is now but it's been moved and no longer fits} I need a spot for my china away from little hands, so I'm thinking of options- here are the two I have so far:


shelves- these are beautiful aren't they? {photo from exitpursuedbybear.typepad.com}


or build a stunning corner cabinet {photo from Country Living}


but I'd of course use the help of Ana-White.com


Anyway, I'm excited to have been take some vacation time and have a 'staycation' with him for a few days just doing house projects. Yay for redesign! 

Tuesday, January 4, 2011

the {little} store

I think I'm going to build Zuriah a store. She loves playing 'store'. 

And I love playing it with her {it's as close to working as I can get these days} but really I love the learning aspect of it. We play with pretend money and I am teaching her about the values of everything, and she's learning math by counting it all. 

She just loves it, and what a great way to learn.

I might do something like this: 


{from Pottery Barn Kids}

by the way this is just a wood frame with fabric- I asked them if you can buy the fabric part separate and you can, otherwise it wouldn't be too hard to sew, and I would use iron on appliques.


{this one is a DIY project from Chic Mother and Baby}

this one is a little intense, I would have no where to put it, but maybe something similar on a smaller scale. And I would have to add a check out of course!


{this one is Land of Nod}

I love the chalkboard, too cute. 

What I really love about the idea of a store is she might even be able to sell some of her little handmade stuff she will surely make when she's a little older. When I was younger I have fond memories of making all kinds of things with my friends and then selling them at our lemonade stand. Too fun. It is such a good way for a little mind to learn the basics of business!

Sunday, January 2, 2011

genealogy

Have I ever mentioned my love for genealogy? 


I just recently started getting really into it. My fascination started with my husband's grandmother showing me old photos "this is my grandma's grandfather..." she would say {aka Ben's great-great-great-great grandfather}, "this is the rocking chair he made," {in her living room for Zuriah and Anah to use}, "he raised my grandmother..." {the above photo is him with her grandmother and great-aunt}. What a wealth of information I might lose if I don't start to write this down. So I began to write down everything I could get from all sides of my family. 


I'd ask


names
dates {birth, marriage, death}
places
stories
photos


I haven't started using a recorder for stories, but that would be a great idea.


This is a letter dated 1858 that Ben's grandmother had- it's from a man who was headed west for the gold rush {I presume}. She has no clue how she's related but she knows she is somehow. I'm determined to find out.


I'm still sort of in stage one of interviewing family but I have done a little more research on some branches. I've used a trial to Ancestry.com which has been fantastic {I'm really considering a membership}. I've found ship records, census records with addresses, even a handwritten passport application written by my great-great-great grandfather. 


FASCINATING!


When I was home over Christmas I went to a German Heritage Center they have in Davenport, Iowa {where all my dad's side of the family is from}. I knew that side had a lumber company and were pretty wealthy, but I really had no clue how big all of it was. They were actually mentioned several times at the museum I was at! The photo above are a few of the workers from the lumber company.


When talking with my mom she showed me a letter written by my great-grandfather right before he was about to leave for WWI, he was 18. I've learned a great deal just from talking with relatives. 


When talking with my dad about his family I found every man 5 generations back was an entrepreneur of some kind. THAT'S where I get it! I love finding out where I'm from.


Through census records and newspaper articles {microfilm from the library}, I've found one of the towns we're from in Germany:


Heiligenhafen {which I've learned to spell and pretend to know how to pronounce} Schleswig Holstein {northern Germany}


YES I want to go there. And I will, but who knows when.


:::


You can see how exciting it can be once you get started! One of the most exciting things I love about it is telling my family once I find something- I've more than surprised a number of them with things I've found.


So here are the steps as far as I can tell on how to research your family:


No. 1  
talk with relatives and get as much information as possible {get names, dates, people, places, stories, photos etc.}


No. 2   
start researching from home using a site like Ancestry.com or going to the library 


No. 3  
travel to towns in your country where you know your ancestors lived. Most likely you'll find much more information, such as newspaper articles and photos than you would in another city.


No. 4    
Once you've found all that you feel you can from your country, you can either write letters to your ancestors cities where they're from in other countries, {churches have baptism, birth, marriage, and death records centuries old} or you can physically travel there if you have the means.


:::


Fun, huh?  


LinkWithin

Related Posts Plugin for WordPress, Blogger...